Showing posts with label Computers. Show all posts

November 01, 2020

Creating a bootable flash drive

Warning: You can't Jailbreak using Oracle VMBox (primarily because it doesn't support USB connections, however if you can bypass that, then maybe yes, you can) but it's not really worth the hassle. The way I did it was by creating a bootable flash drive with Ubuntu and then Jailbreaking using checkra1n.

Steps:

First things first, let's set up the flash drive.
  1. Download Ubuntu ISOs from [https://ubuntu.com/download/desktop]. I used Ubuntu 20.10.
  2. Download Rufus [https://rufus.ie/].
  3. Set it up! I didn't put any persistence in, but you can, depending if you do this a lot.

Boot up: 

I use an MSI GS-65 Stealth, which is a classic beauty, and so I spam F11 as soon as the MSI logo comes up. And then choose the flash drive to boot from. If this doesn't work for you, you may want to change the boot order of your device. For me it's spamming Del as soon as the MSI logo comes up. 

You don't have to install Ubuntu. Click on "Try Ubuntu", we're trying to save some sweet time.

Flex your terminal skillz:

Hurray, fire up the terminal (press
Ctrl + Alt + T
). And let's follow these steps by Reddit user
u/xdhelicopter
the link to the original article can be accessed here.

Run these commands line by line:
echo "deb https://assets.checkra.in/debian /" | sudo tee -a /etc/apt/sources.list
sudo apt-key adv --fetch-keys https://assets.checkra.in/debian/archive.key
sudo apt update
sudo add-apt-repository "deb http://archive.ubuntu.com/ubuntu $(lsb_release -sc) main universe"
sudo apt-get update
sudo apt-get install libncurses5-dev
sudo apt-get install libirecovery3
sudo apt-get install checkra1n

Now, go to checkra1n's official website (please be-ware of phishing sites) https://checkra.in/releases/#all-downloads and click on "Download for Linux (CLI, x86_64)". At the time of writing this, Checkra1n's version is 0.11.0 beta. Go to your Downloads folder, right click checkra1n > Properties ... and copy it's path. 

Get back to terminal and enter this (obviously change it according to your path):

echo "deb https://assets.checkra.in/debian /" | sudo tee -a /etc/apt/sources.list
chmod a+rwx /home/ubuntu/Downloads/checkra1n
However, after executing the last command it won't throw up anything, which means we're good.

Running checkra1n using terminal (not recommended)

Oh, you're such a brave heart, aren't you? Enter the following in the terminal:

cd Downloads
sudo ./checkra1n


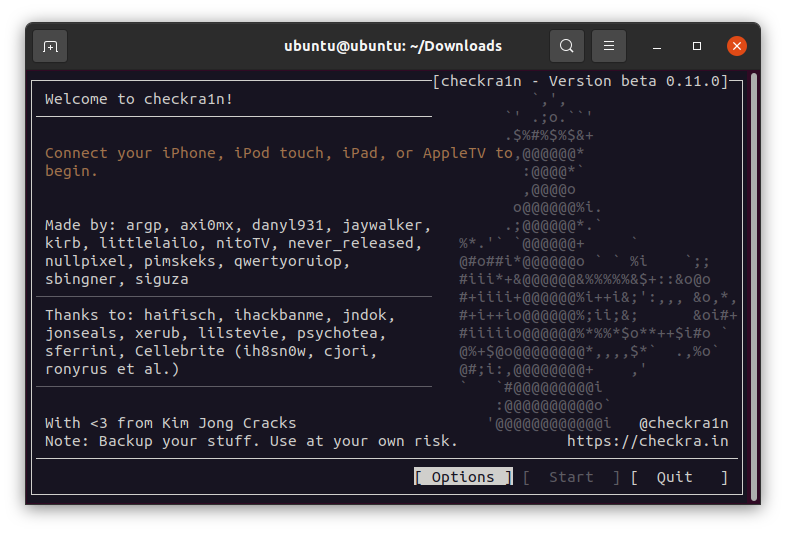
Running checkra1n using GUI (recommended)

For me, the Jailbreak got stuck on "right before trigger". That was maybe because I hadn't installed
libirecovery3
, but I switched to the GUI anyway, it seemed sleeker to me. 
 

 Plug in your iPhone and checkra1n will guide you through the rest of the steps.

Common errors (a.k.a. headaches):

  • checkra1n stuck at right before trigger: Have you installed the dependencies correctly? If not,
    sudo apt-get remove checkra1n
    sudo add-apt-repository "deb http://archive.ubuntu.com/ubuntu $(lsb_release -sc) main universe"
    sudo apt-get install libncurses5-dev
    sudo apt-get install libirecovery3
    sudo apt-get update
    sudo apt-get-upgrade
    sudo apt-get install checkra1n
    
  • checkra1n entering DFU fails: Remove passcode from iPhone, change USB port, use checkra1n GUI. To get iPhone out of GUI hold down power button and volume down button simultaneously till Apple logo appears on screen.

Jailbreak headaches:

Some apps like Google Pay, PhonePe, and other UPI apps etc. aren't supported on Jailbroken devices. To bypass jailbreak detection, go to Cydia > Sources > Edit > Add. Then add
https://ryleyangus.com/repo/
as a source. Find and install Liberty Lite and then enable the apps in the settings for which you want the Jailbreak detection by-passed.


June 09, 2019
Sometimes when you're trying to copy a large file, say over 4 GB, you might get the error "File too large for destination file system" even though your storage drive might actually have more free space available. It might be possible that your storage device is formatted with FAT32 file system, because FAT32 supports individual files only upto 4 GB and total volumes upto 2 TB.

Microsoft started using NTFS filesystems as an alternative back in 2001 (good old days of Windows XP) for its internal hard drives but USB flash drives even today come formatted with a FAT32 filesystem.

Fixes:

1. (Easiest / No downloading of additional software required)

Make sure the flash drive is empty, copy the contents if need be to a local disk on your computer.

CAUTION: This will delete the data present in your removable drive. Please ensure that you copy it to a local disk in your computer.

Step 1: Right click on the USB drive > Format...


 Step 2: Choose the file system as NTFS and click on the Start button.


2. Split the file up into volumes smaller pieces, each piece should individually be under 4 GB:

This can be used for large video files, which you wouldn't really mind being split up. You'll need a archiver such as WinRAR or 7-zip. Here's how you do this using 7-zip, the steps remain more or less the same with other software.

Step 1: Right click on the file you want to copy into the flash drive > 7-Zip > Add to archive...

Step 2: There will be an option on the lines of Split to volumes, bytes:. Enter a suitable number, remember that you need to keep the individual file size under 4 GB.


January 06, 2019

Mark had just gotten into MIT in Cambridge and he began mining cryptocurrencies more or less by accident. In November 2016, Mark stumbled upon NiceHash, which is an online marketplace where you can mine Cryptocurrencies for willing buyers. He started small, with a desktop computer topped up with a graphics card.

Within a few weeks, he had recovered the Rs. 8000 ($120) cost of his card, and earned yet another Rs. 13,500 ($200) which he used for buying another one.

e went up to his professor and asked for his old desktop systems which he had lying dormant. Because when equipped with a graphics card, those 'garbage' PCs worked just fine for mining. Mark switched from NiceHash to mining ether, which was then the most popular Bitcoin alternative.

Every time he mined enough ether to cover the cost, he bought a new graphics card and traded the leftover currency into Bitcoin for safekeeping. By 2017, he was running 7 computers and mining ether round the clock from his dorm room.

By September, his profits totaled 1 Bitcoin, which was $4,500 (approx. 3 lakhs) at that time. And just about four months later, when Bitcoin blew up and he'd diversified his portfolio, he had amassed well over 13 lakhs ($20,000) in digital cash.


What helped him?

In typical mining scenarios, electricity costs take up the highest fraction of operational costs. Mark benefitted because he operated his rig at his dorm, and MIT doesn't charge hostellers for electricity bills. The electricity and internet are part of the tuition.

What is mining?

Paper currencies are issued by the bank and thus they come to us printed as a physical entity, which we call banknotes. Cryptocurrency, like Bitcoin, on the other hand, does not come in a physical form. This creates a major risk from hackers, who can thus create Bitcoins from theoretically nothing.

Bitcoin mining is a way to keep transactions secure. Imagine a public ledger which has records of every transaction made through Bitcoin. This is what is called as Blockchain. In this ledger, you can't remove entries, and so to make a change you'll have to add another entry.

To keep Blockchain secure, it's distributed and hosted by various computers all over the world, and those computers are known as miners.

Sources:

The Rule Breakers Guide to Cryptocurrencies: What Is Blockchain? — The Motley Fool 

December 20, 2018
A curious learner: Hey Ansh, I know a bit of basic HTML, can you help me learn more?

Hey curious learner, why not! Everyone wants to have a cool website (along with a fidget spinner) these days. (And no, Amazon isn't giving them together) First we're going to download some cool softwares, which would help you to code faster.
You can try either Notepad++ or Sublime Text. They're both free softwares, and you can download them using these links. I prefer to use Sublime Text for coding in HTML.

Getting started with Sublime Text

The beauty of this editor is the variety of shortcuts it has to offer. Let's not waste time. There's this way to just open up Sublime Text and get started with coding; and then, there's this way which is likely to be beneficial in the future so let's stick with the latter.

Create a folder

Websites have their own separate folder. This makes searching and uploading files to the server easy, and helps us to be organised. So first create a new folder. I'm creating a folder named
ansh
. Next, open Sublime Text and do this:
File menu > Open Folder...
Browse and open your new folder and you're done. Remember this step.


Create the file
index.html

index.html will be the main file of the website. A front page sort of thing, it's called the homepage. Now, I'm sure you remember the old school typing
<html>...</html>
and so on. We won't type it manually, we'll ask Sublime Text to type it. Here's how:

Press Ctrl+Shift+P

A small box opens up. It's called Command Palette (I didn't know it's called that, I had to look that up just to tell you). Type
sshtml
.


Basically what you've done is that you've told Sublime Text that the language you're typing is HTML. The
ss
in
sshtml
means set syntax (I knew this).
Now type
<h
(you don't even need to type
html
, just type
h
. As soon as you do that, you'll see a menu like this:

Press Tab two times and see the magic! Finally, put something between the title tags and the body tags and save the document as
index.html
in your folder. Why don't we match our files? My
index.html
after doing all this looks like this:

<!DOCTYPE html>
<html>
<head>
 <title>My good ole webpage</title>
</head>
<body>
 Hello, I'm Ansh Sharma. Welcome to my website :-)
</body>
</html>

Save this file and try opening this with your favorite web-browser. Also, congratulations, you've successfully crafted your first website.

This wiki can also be viewed over GitHub.

November 15, 2013

Yes, I can understand. You're playing an awesome game. You love the game and want to save it offline. Perhaps you're going to play it later or your internet connection might be slow. The  list of reasons is endless. But whatever may be the reason, there's a single solution. Go for it. Please allow me to show that to you.

Note: No software other than Mozilla Firefox is required.

The steps:
  1. Open Firefox.
  2. Open that favorite game and wait for it to load completely.
  3. Save that page — File  ( CTRL + S ). Remember to set the "Save as Type" to — Webpage, Complete.
  4. Wherever you save, there will be a folder and a webpage file. 
  5. Open up the folder and look for a ".swf" file. That is your game. If there is more than one flash file, it usually is the one named the title of the game. If none are, try them all.
  6. Open that file using any of your favorite browser — Right click, Open with ...
  7. Enjoy the game.

Originally written on 15/11/13, grammatical and other corrections made by Ansh Sharma on 24/06/17.

November 08, 2013
HP Printers sometimes notoriously show warnings like the ‘door is open’ and stops printing documents when it isn’t actually open. This, no doubt, could've been an ongoing source of frustration. This is how you can tackle that. And yes, without downloading a thing.

Am currently using Windows 7, but if you play around, you’ll discover for yourself on how to do that on other versions. The problem is chiefly due to the fact that your Print Spooler isn’t responding. Restarting the service should solve the problem.

The steps:
  1. Unplug the printer first (this is important).
  2. Open up the start menu and type in "services" without the quotes. Press Enter key.
  3. Wait for the services pane to open.
  4. Find Print Spooler in the list and (single) click on it.
  5. On the left, there will be a link to restart the service. Click on it. When the service has been successfully restarted, the printer should start working.
Update (Steps for Windows 8.1):
  1. Hit the Windows key to bring up the start screen. Start typing "services".
  1. Next, find print spooler and click on the link to the left to restart the service.

June 13, 2012 4

Chess Titans is a Windows 7 game. The game is not supported by other operating systems. But if you have Windows 7 this game can be installed within minutes. Follow the steps given below to install Chess Titans.

Note: This process does not require downloading.

The Steps
  1. Go to Start menu > Control Panel.
  2. There are two possible views of Control panel. First one is the category view and the second one is the icon view. 
  3. If you are on the icons view then click on Programs and features. If you are on Category view, then click on Uninstall a program.
    Note: View of Control Panel can be changed by clicking on the top right menu which is marked as "View by".


  1. After this at the left you see a blue panel on the screen. Check its third option. It will be Turn Windows features on or off. Click on it.
  2. A popup window will open. Maximize the window to get a good view.
  3. In that window there will be a folder marked as Games. Double click on that folder. 
  4. There will be many games including Chess Titans. Select all games you require. Click on OK
  5. Windows will install your games and then revert back to the uninstall a program screen. Close it and you are done.

MARI themes

Powered by Blogger.